Showing posts with label Sally Hansen. Show all posts

Friday, December 23, 2016

Nail Art: David's Tea Advent Calendar 2016 (Part 1)

So uhhh hi :) School, work, and moving took up a lot more of my time than I thought, so here we are in December! Let's get right to it: I'm a big nerd for David's Tea, so when the 24 Days of Tea advent calendar came up, I snapped it up right away. I loved last year's deep teal and penguin theme so much--I even did a value breakdown post--that I did some inspired nail art. I'm indifferent to this year's family of mice, but I adore the colour palette of pastel blue, jade green, and coral. Time for a skittles manicure!

David's Tea 24 Days of Tea Advent Calendar 2016 nail art
By the way, moving is annoying. Doing this manicure made me realize a bunch of my polishes are still missing! So some of the shades I used were actually my second or third picks, because I couldn't find the other polishes that I thought were much closer to the advent calendar shades.

David's Tea 24 Days of Tea Advent Calendar 2016 nail art
I haven't done any detail work in a while, so while it was fun to do the numbers in gold, I was definitely rusty. My favourite brush is a super long, fine eBay nail art brush that I hand-trimmed with a single edge razor to be even finer.

Saturday, June 18, 2016

Recap: London Drugs Beauty Event 2016

Another year, another preview of all the new and exciting things coming to London Drugs this year! This year's Beauty Event had 16 different brands presenting new releases in skin care, cosmetics, and fragrance. As always, I won't be writing about everything I saw that night, but hopefully you are just as excited about the favourites I'm sharing today. The lighting was very blue, but I've tried as best as I can to correct for colour accuracy.

Sally Hansen Color Therapy nail polish
Sally Hansen Color Therapy nail polish shades accompanied by matching jellybeans :D
A new range of nail polishes is coming this year from Sally Hansen. The Color Therapy line has argan oil infused into the polish formula, which promises to nourish nails.

Sally Hansen Color Therapy nail polish
I'm a little wary of the affect that the argan oil may have on the wear time of the polishes, but hopefully it will make a different to my sad, dry nails.

Wednesday, December 16, 2015

Nail Art Inspirations: David's Tea 24 Days of Tea

Last month, I gushed over the charming, festive packaging of David's Tea's 24 Days of Tea advent calendar. Penguins! Teal! Pastel mint! Tea! All things I love. I said I would probably end up doing some nail art inspired by the illustrations in the advent calendar, so here are the results!

David's Tea 24 Days of Tea Nail Art
Sometimes I use acrylic paints in nail art--it's honestly way easier and forgiving to use, and much easier to clean out of nail art brushes. For some reason, I was determined this time to use all nail polish, so everything used in this look is nail polish! The other reason why I like using acrylics is to mix colours to create just the right shade I need, but surprisingly all the polishes I used are a dead-on match to the colours in the advent calendar.

David's Tea 24 Days of Tea Nail Art
Polishes used:
  • Essie Going Incognito (dark green: little finger base colour)
  • OPI Alpine Snow (white: stars, branches, penguin's tummy)
  • Orly Luxe (gold: stars, penguin's beak)
  • American Apparel Peacock (teal: base colour)
  • Sally Hansen Insta-Dri Blue-Away (light blue; penguin body, dots)
  • butter London Pillar Box Red (bright red: base colour, penguin's scarf)

As always, I had a lot of fun! I dug up a lot of my older polishes for this, and it made me remember how much I love Essie Going Incognito for its rich, deep green, and butter London Pillar Box Red for its stunning formula and colour.

David's Tea 24 Days of Tea Nail Art
Did you pick up this advent calendar set before it sold out? I mayyyyy have cheated and opened a few early.. I couldn't help it, I really wanted to try Gingerbread Cookie and Cardamom French Toast--and it was worth it because they are both delicious! >:D

Friday, April 24, 2015

PFW Nail Art: Rick Owens Fall 2015

Hi all, it has been quiet here while I temporarily shift my focus to work and school. After next weekend, I'll have roughly two months of freedom before my next module starts, so hopefully I can catch up to that terrifying backlog lurking around...

A little birdie owl named Liz suggested I check out Rick Owens' latest runway collection for my next fashion week nail art look. I have to admit that while it's very captivating visually, I probably wouldn't have chosen this collection myself; the most interesting bits are structural, which is hard to translate into nail art with humble conventional polishes and acrylics. Here are three looks from the collection that I drew inspiration from:

Images source: Vogue UK / composite by me
And here's what I did:
Paris Fashion Week nail art: Rick Owens AW 2015
Just realized this now, but I unintentionally arranged the composite of runway looks in the same order that they appear on my nails...
Polishes used:
  • OPI Alpine Snow (base shade for index and ring fingers)
  • China Glaze Pelican Grey (grey for index and ring fingers)
  • Sally Hansen Xtreme Wear in Black Out (index and middle fingers)
  • Orly Night Owl (shimmery tan beige for middle finger)
  • Orly Dazzle (silver stripe on middle finger)
  • Orly Luxe (gold detail work and little finger)
I tried to layer Alpine Snow under Pelican Grey to lighten the grey a little bit and it kinda worked, but it had a weird effect of Pelican Grey applying kind of patchy and strangely. I dunno. I didn't think I needed more grey polishes but it looks like I'm missing a very pale gray (the dangers of nail art: you see gaps in your collection that you wouldn't ordinarily notice @__@)

Saturday, March 14, 2015

NYFW Nail Art: Lela Rose Fall 2015 RTW

More NYFW nail art for you today - this time it's Lela Rose ready-to-wear. This collection is full of gorgeous pieces, a lot of muted greys and creams with splashes of bold colour. This dress really caught my eye though:

image source: Vogue UK
SO PRETTY. Here's my interpretation (all in natural light, yay!)

NYFW Nail Art: Lela Rose Fall 2015 RTW
And it is crazy easy to do. Apply a black polish base, then randomly dot on your three colours (let one colour dry before you start the next!) Seriously, just slap it on with any small art brush you have lying around.

Wednesday, November 26, 2014

Nail art inspiration: butter London Steampunk Ball

I pull nail art inspiration from everything from nature to architecture to graphic prints, but I guess I shouldn't be surprised that a lot of my inspiration still comes from the beauty world. (Case in point: my Marc Jacobs Daisy Dream nails, and FYI I have another Marc Jacobs-inspired nail post coming soon!) When the holiday Steampunk Ball set from butter London popped up on my Instagram feed, I instantly went YES, DOING THIS and took a screenshot.
image via Nordstrom
I just love the look of all the gears and cogwheels; butter London is amazing at making covetable polishes and packaging.

Nail art: inspired by butter London Steampunk Ball
I started out with a base of Sally Hansen Xtreme Wear in Black Out as the base (two coats), then topped it with L'Oreal The Matte Velvet, a mattifying top coat (I love this one for the not-super-flat finish.) Next, I painted in the gears and cogs with Orly Luxe and China Glaze Gossip Over Gimlets. butter London seems to use only one shade of gold on the packaging, but I thought it would be fun to have a two-tone thing going on.

Nail art: inspired by butter London Steampunk Ball
For the longest time, I just could not figure out why my gears made me think less steampunk-industrial and more weird metallic flowers. I realized that I painted the teeth on my gears (called cogs apparently; thanks Wikipedia!) way too closely together--these gears are definitely just for show because they can't mesh together with other gears haha! I've since found out that butter London has a whole Steampunk Ball collection, including a set with rose-gold gears, so I might try this again and pay a little more attention next time.

What's a holiday beauty set that's caught your eye lately?

Saturday, November 15, 2014

Two new ways to try the gradient nail

Hello! I'm back from a quick trip to Portland just in time to sneak in a post before the week is out! If you've wanted to try mixing up your standard smooth sponge gradient, this is the post for you. I tested out two different methods that put a new twist on the gradient nail, and used the same colours for ease of comparison.

Watercolour gradient nail art
First up is the "watercolour gradient" look. I absolutely loved this look when I saw it on The Nailasaurus and had to try it for myself! I have to say that Sammy makes it look so easy but I struggled a little bit with it (this is attempt #2). I don't want to be that person that blames it on the brush, but I swear it's because my one flat art brush (I mostly have fine detail brushes) sucks. It seemed to just drag the colour around unevenly a lot.

Tuesday, September 30, 2014

Marc Jacobs Daisy Dream Nails

Marc Jacobs Daisy Dream nail art
Marc Jacobs Daisy and its various iterations have been around since 2007, yet can you believe I've never bothered to sample one until Daisy Dream? Maybe it was the pretty white-on-cornflower-blue look, but I ended up taking a sample home and getting a little nail art inspiration too.

Marc Jacobs Daisy Dream nail art
I used some of my favourite nail polish staples for art: Sally Hansen Insta-Dri in Blue-Away, OPI Alpine Snow, and Orly Luxe. The signature "daisy" is super easy to do: just take a large-ended dotting tool (or use the round end of a bobby pin) and make 5 dots in a small circle, slightly overlapping each other. Let that dry fully and complete with a dot in the center matching your base colour or in gold. Repeat as many times as you like :> If you find there's not enough definition between your "petals", go back in between the dots with a very fine brush dipped in the base colour.

Marc Jacobs Daisy Dream nail art
Floral fruity is one of my favourite types of fragrance, so I do like Daisy Dream. It's a little sweet from raspberry and lychee notes, but clean and not overly young. I'll finish my sample spritzer but it's not a very unique scent--there is definitely a "been there, smelled that" vibe, so I'm skipping on buying a bottle.

What fragrances have you tried lately? I spritzed on Guerlain Aqua Allegoria Limon Verde and loved the bright burst of citrus.

Saturday, January 11, 2014

Mint ruffian

Hello! Here's a quick post before I go off to start my weekend. This is a post that, like many, I meant to share a while ago but didn't get around to editing the photos until now.

I remember seeing the "ruffian mani" around a lot in early 2013; sister to the half-moon, it's a look that features a crescent of contrasting nail colour against the cuticle. I tried it for myself and was pleasantly surprised at how well it turned out (slightly lumpy tips aside). I used Orly Dazzle as my crescent and Sally Hansen Insta-Dri in Mint Sprint to cover the rest of my nail. Mint Sprint leans a little too blue for me to call it mint, but "mint ruffian" kind of has a nice ring to it anyway.

I don't really have any tips or tricks because I did this freehand, but it's relatively easy as long as you are able to paint your nails without getting polish all over your cuticles. If paper hole reinforcements or other curved adhesives happen to match the size and shape of your cuticle, you can try using those as a guide. It's also best to use relatively opaque polishes to avoid having too many coats of polish, which can lead to easy chipping or an overly thick look; I used a coat of Orly Dazzle to cover the entire nail, and two coats of Mint Sprint (but I suspect one would have been enough).

For Mint Sprint, starting with the centre stroke, I touched the brush down a little further away than where I intended the polish to actually start, and pushed the brush slightly back towards the cuticle to create the rounded edge. I completed the stroke by pulling the polish to the nail tip. Then I just followed the rounded shape created to do the side strokes. You're sort of doing this as if your cuticle starts a bit further up than it really does, and yes, it's that simple.

Will you be trying the ruffian nail? What are you up to this weekend?

Sunday, January 5, 2014

Maybelline Color Show Polka Dots in Drops of Jade

Drops of Jade is part of the Maybelline Color Show Polka Dots collection that came out this past summer, when people were all over the speckled nail look featured in other beauty brands such as Deborah Lippman, Illamasqua, Hard Candy, and Nails Inc. Personally, I loved Illamasqua's version, which had a mix of small and large black glitters in milky bases to imitate the look of speckled bird's eggs. What I didn't love as much was the $22 CAD price tag. I was super excited when Maybelline released Polka Dots, because its mix of small and large hexagonal black and white glitter made it very similar to the Illamasqua polishes.

The milky, slightly jelly jade green is so pretty, and perfect for creating that layered polka dot look. I used two coats of Drops of Jade over Sally Hansen Insta-Dri in Mint Sprint on my little and ring fingers, and applied three coats of Drops of Jade on its own on my middle and index fingers. Most people I polled preferred it on its own, but I like it best layered on top of another polish because I felt like three coats' worth of polka dots looked a little crowded.

I was so worried about it going out of stock or getting discontinued that I picked it up right away! I guess it must have been pretty popular, because I still see this collection in stores (~$3-4 CAD).

How is your 2014 going so far? Which look do you prefer?

Wednesday, December 18, 2013

China Glaze holiday nail design contest

When I heard that China Glaze was holding a holiday nail art contest, I figured it was a good opportunity for me to try a little freehand nail art again. I wish I had given myself more time to work on this; I wasn't planning to enter at first because I wasn't feeling too good about my odds considering all the super talented nail artists out there, but I decided to try anyway for fun and for the practice.


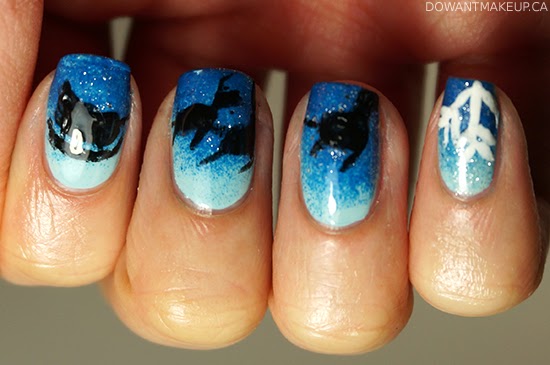
Here's my entry: a dark blue-light blue gradient with sleigh and reindeer silhouettes and random snowflake branches. The idea was Santa returning home after delivering gifts all night, as dawn is breaking :>

For the gradient, I used China Glaze Kinetic Candy again and sponged on L'Oreal Colour Riche in Jet Set to Paris (I'm not the only one amused by the funny coincidence of this polish name, right?) I initially picked China Glaze Up All Night (again, oddly fitting) for a deeper, darker sky, but it leans a little violet and clashed with Kinetic Candy. On top of the darker blue I layered Layla Pro N.22 (Glitterland), a topper packed with super fine and small circular silver glitter, for stars and a little holiday sparkle. I used Sally Hansen Xtreme Wear in Black Out for the silhouettes and Sinful Colors Snow Me White for the snowflake. Ordinarily I would use black and white acrylic or liquid acrylic paints for a smoother, more opaque result but didn't want to risk running into trouble for not using nail lacquer.

Originally I had envisioned the silhouettes flying over treetops and houses, but after looking at close-up photos of nails all the time, sometimes I forget that nails are really really small and I just didn't plan enough space for that. Still, I'm happy with the overall look and hope you like it enough to vote for my entry here! You do have to vote for three separate entries and click through a confirmation email but I think this helps create a very fair voting system.

I kinda wish I had dotted a little red glitter nose on one of those reindeer! What would your holiday nail art look like?

Saturday, April 20, 2013

Sally Hansen Choco-Latte

You don't get up to the number of nail polishes I have without picking up a few duds along the way. I'm used to the ones that are too sheer or gloppy, or apply patchy/streaky but somehow I've wound up with a shade that's just sorta ugly. It's not that Sally Hansen's Choco-Latte is universally ugly, it just looks so damn unflattering on me that I'm surprised/confused at myself for picking it in the first place.

Sally Hansen Complete Salon Manicure Choco-Latte / Orly Luxe
I thought the putty-like colour in the bottle would translate to a nude on me, but it has a pinky-orange-peach thing going on that I just didn't like. You can see in the photo here that the nail colour is not quite the same as the bottle colour. Something about my skin tone just brings out a mustard-iness in this polish that I don't like. I think this shade (apparently a past Allure Best of Beauty winner) would be much more flattering on someone with cooler-toned skin or a deeper skin tone; I'm probably going to try to find a friend that falls into one of these categories to give this away.

Although the Sally Hansen Complete Salon Manicure line is advertised as being "5 steps in 1", I always use base coat and top coat to keep my nail colour chip-free as long as possible. I do like the wide, thick brush (similar to Rimmel Lasting Finish Pro or Sally Hansen Insta-Dri) that applies lacquer evenly.

Have you ever bought a nail polish that you thought looked unflattering on you?

Friday, December 21, 2012

Snowflake nails

China Glaze Kinetic Candy  •  (ring finger) Sally Hansen Insta-Dri Blue-Away  •  white acrylic ink  
I think all the holiday/winter-inspired nails popping up on my Pinterest and Tumblr finally inspired me. Vancouver recently had its first real snow of the season, and coincidentally, my very first freehand nail art features snowflakes :>

I have a soft spot for icy blues, so I did it over China Glaze Kinetic Candy for most fingers, and Sally Hansen Insta-Dri Blue-Away on the ring finger. The two are fairly close, but Blue-Away is a brighter and more vivid blue, while Kinetic Candy has a tinge of grey to it. I used white acrylic ink for the snowflakes but white polish works fine too, as long as it is fairly opaque.

I like the index fingernail the best for the extra-dainty snowflake on the lower corner. It's much more fool-resistant to have 2-3 partially-showing snowflakes than to attempt to paint on a full one (see: pinky finger) and lets more of that lovely base colour come through.

Confession time: I only did my right hand, left hand is snowflake-less. All it took was one shaky line on my fingernail and I thought, LOL NOPE. I always admired nail artists for their amazing freehand nail art but now I have to give extra respect to those that paint on both hands. I definitely need to practice.

I really love how these turned out; it is shockingly easy to do but the results are quite nice, I think! Although it is pretty simple, I can post a quick picture tutorial if anyone is interested.

Thursday, July 26, 2012

Fit for a princess

Back when my nail polish collection was small enough to store in a single tray under my desk (my collection has since multiplied at a horrifying rate), I swatched Essie St Lucia Lilac for the first time. I recently decided to revisit it, and add something extra by topping it with Sally Hansen Xtreme Wear in Strobe Light. The result is pretty--I got compliments, one friend demanded this combination be her next mani from me--but the combination of lilac and sparkly-ness just reads too princesses-and-unicorns for my taste.

The picture below I posted on Instagram shows the glitter in Strobe Light a bit better:
Strobe Light's small and tiny round pinky-lavender and holographic glitter caught my attention after admiring how it looked by itself on my cousin's nails. I'm not brave enough to try to remove 3-4 coats of this glitter off all ten fingers, but maybe I'll try an accent nail next time?
© Do Want Makeup 2016 | Blogger Template by Enny Law - Ngetik Dot Com - Nulis