Monday, April 30, 2012

Gold paisley nails

This is an updated repost from my original blog on Tumblr

Rimmel English Rose • Orly Luxe • Konad m60
This isn’t the greatest picture, but I really loved how this one turned out. I stamped the design on my nails at different angles/using different parts of the design since I like a little irregularity in my nail art :>

A field of daisies

This is an updated repost from my original blog on Tumblr

Orly Ancient Jade • Konad white polish • Konad m26 • Orly Spark
I only decided to dot the centers of the flowers at the last minute. If I were to do a similar design again, I'd definitely want a yellow Orly Spark accent nail ;>

Rimmel English Rose with fishnet accent nail

This is an updated repost from my original blog on Tumblr

Rimmel English Rose • Essie Pink Diamond • Konad m57
The real colour of English Rose is somewhere between the two pictures. It’s definitely not a brick red; it’s more of a berry and much cooler, but not as bright as the flash picture. Pink Diamond is a pearly light pink, so it ends up looking a bit like a subtle nude on top of English Rose. I got a lot of compliments on it ^o^

Saturday, April 28, 2012

Bright sunset gradient nails

This is an updated repost from my original blog on Tumblr

I tried a gradient nail look with Revlon Mad About Mango, Essie Flirt, and Rimmel English Rose. The result is waaaay brighter than I expected but I kind of like it and it reminded me of a sunset. I think I picked shades that were too close to each other, because the gradient effect is really subtle unless under bright light. Even under flash it’s hard to see Flirt (mid-nail) and English Rose (tip) as two separate colours.

Friday, April 27, 2012

FOTD: Wedding reception

This is an updated repost from my original blog on Tumblr

I definitely could have pulled up the grey/black more since it’s an evening look; I'm just shy about more dramatic makeup. I love that false lashes, whether bold or natural, make such a huge difference to a look. Unfortunately I'm still terrible at putting them on!
    Face:
  • Garnier Moisture Rescue Refreshing Gel Cream
  • L’Oreal Genesis Eye Serum
  • Garnier Nutritioniste Skin Renew Anti-Dark Circle Eye Roller (undereye, lid)
  • Laura Mercier Secret Concealer in 2
  • GOSH X-Ceptional Wear foundation in 14 Sand
  • Marcelle Face Powder in Translucent
  • Marcelle Cream Blusher in Russet
  • Hard Candy Baked Blush in Living Doll
    Eyes:
  • NYX Jumbo Eye Pencil in Milk (lid as base)
  • Revlon Luxurious Color Matte shadow in Vintage Lace (brow bone)
  • Revlon Colorstay 12 Hour Eyeshadow Quad in Silver Fox (turquoise shade in lid; grey shade in crease and lower lashline)
  • Gosh Effect Powder in Azure (lid)
  • Wet n Wild Color Icon Eyeshadow Collection in Petal Pusher (glittery black definer shade in crease)
  • false lashes applied with Revlon Precision Lash Adhesive
  • L’Oreal Voluminous Million Lashes mascara in Blackest Black
  • MAC Fluidline in Blacktrack
  • Rimmel Exaggerate Waterproof Eye Definer in Noir (tightline upper lashline and dotted along lower lashline)
  • Revlon ColorStay Brow Enhancer in Light Brown/Champagne (also used Champagne highlighter for inner corners)
  • Smashbox Brow Tech wax
    Lips:
  • Revlon Super Lustrous lipstick in Mauvy Night (creme finish)

Review: Revlon Luxurious Color Satin Eyeshadow in Peacock Lustre

This is an updated repost from my original blog on Tumblr

Peacock Lustre was really an impulse buy: Ulta had buy one get one 50% and the colour was just so pretty and unique to my current stash of shadows. I don’t have a teal quite like this, since it leans more green than my other shadows. The base is a sort of foresty-green (I’m terrible at describing colours).

The large window on the packaging is great at showing off the colour and catching your eye at the drugstore, but overall the black plastic case feels a bit flimsy and cheap; I wouldn’t suggest throwing this in your bag where it could get knocked around a lot.

Not that it's especially important to me, but I don't really feel it’s “peacock” enough—the shimmeriness is right, but it needs to be either brighter or deeper (see: Joe Fresh Peacock nail polish). For its price range, it feels fairly soft and smooth.

Swiped twice each: wet / dry over concealer / dry (flash / no flash)
Swatching it over concealer gave the shadow a teeny bit more depth, although it’s kind of hard to tell in the picture.

The only shadows I used for this look are Peacock Lustre and a white shadow for under the brow. I really had to pack it on in layers in order to achieve the colour you see here. Peacock Lustre ends up applying a bit sheer, although using it wet can help (I used it dry here.)
I wore it for several hours with zero creasing and didn’t notice much fading. My skin is normal/dry though, so I can’t say people with oilier lids will have the same results.

Overall, if you are looking for something to use as a sheer wash of colour on the lids, this could be a good buy. It takes some work to get the shade to be as dramatic on your eyes as it looks in the pan, but at least you get there (or close) eventually. I got this on sale for about $2.50 USD in Washington, but if I had bought it in Canada where it runs for about $8, I might have been a little peeved at the level of colour payoff.

Sweet & simple French manicure

This is an updated repost from my original blog on Tumblr

China Glaze Love Letters • Face Shop 308
This look always makes me feel polished and girly :3

Orly Ancient Jade

This is an updated repost from my original blog on Tumblr


I picked up this polish on a trip/adventure to Washington State at Ulta. I really wasn’t looking for another polish but it instantly caught my eye. I was so excited to try it that I attempted it in the middle of the night while super tired after attending a family wedding—and ended up falling asleep after doing one coat on my right hand. I finished it when I woke up in the morning, but due to my sleepiness/grogginess the application isn’t perfect D: But all in all, I’m really loving this colour, although a true jade to me has less blue.


I thought this colour would be a good backdrop to the skull stickers Andy insisted I get from night market (he likes weird-cute things like this). I put the skull inwards (towards me) on my right thumb, and Andy put the skull and crossbones on my left ring finger facing outwards.

Thursday, April 26, 2012

Revlon Super Lustrous Lipsticks (Neutrals part 1)

This is an updated repost from my original blog on Tumblr

There are actually 24 shades in the Neutrals range, so here’s part one. This time I took the swatch photos with flash on, which I think is a bit more accurate.

Coralberry (creme), Champagne on Ice (pearl), Sparkling Cider (pearl),
Caramel Glacé (pearl), Sandalwood Beige (creme), Highbeam Tan (pearl)
Random fun fact: my first blush ever was the Revlon blush with the rectangular pan in a shade called Sandalwood. And yes, I did use the tiny brush included.

Copper Chrome (pearl), Toast of New York (creme), Rum Raisin (creme),
Blushing Nude (creme), Chocolate Velvet (creme), Cocoa Bronze (pearl)
I unintentionally took this second photo with my arm at a different angle in relation to the lighting overhead so these swatches look like they have less of a shine than those in the first one.

Again, a very pigmented shade range. Coralberry really sticks out, though. This bright pink is a lovely colour (especially for Spring!) but it doesn’t have brown tones to it like the others.


More Revlon Super Lustrous love:
Revlon Super Lustrous lipsticks (Plums)
Review: Revlon Super Lustrous lipstick in Wine With Everything (creme)
Revlon Super Lustrous lipsticks (Reds)

Wednesday, April 25, 2012

Review: Revlon Super Lustrous Lipstick in Wine With Everything

This is an updated repost from my original blog on Tumblr

Lipstick and I are still in the beginnings of our relationship. For so long, I avoided it in favour of glosses and tinted balms, thinking that lipsticks were heavy and “too much” (aesthetically speaking) for my preferred makeup style. Lipstick was this thing my mom wore to weddings and other special evening occasions. Super Lustrous proved me wrong and I couldn’t be happier about it.

Actually, I was planning on writing a review on my first-ever lipstick Mauvy Night, the lovely and highly-wearable shade in the Super Lustrous plum family. Then while swatching the SL Reds, I fell for creme-finish Wine With Everything and scooped it up on sale ($4!!)


You’ll have to suspend your love of shiny, luxe packaging for this one; it’s easy to pass by the Super Lustrous display at the drugstore. With its plain black case, it doesn’t do much to compete for your attention in comparison to other products with more eye-catching packaging. With the gold band in the middle, it looks a little old-fashioned too—and not in an adorably retro way. But what it lacks in eye appeal, it makes up for in almost every other way.

The Super Lustrous lipsticks I have tried are smooth to apply, pretty comfortable and easy to wear. It doesn’t feel like I’m wearing lipstick at all, which I think says a lot considering how new I was to lipstick.

Some people expect marathon-wear out of their lipsticks, lasting through meals and drinks and make-out sessions. Super Lustrous isn’t one of those: it does lasts a couple hours, but it comes off a little on my mug when I have a sip of tea and fades slightly after a meal. And I’m totally okay with that. I don’t expect my lip colour to not need reapplication after lunch. Maybe it’s because in my limited experience super-ultra-resilient lip colour is a bit drying and difficult to take off at the end of the day. In any case, it doesn’t really bother me.

Although some people like to prep their lips for lipstick with a swipe of balm, I tested wearing them alone to see if they were as “mega-moisturizing” as Revlon says. My lips are often dry, but I was able to wear it safely without any gross, dry-lip meltdowns.

Two swipes / three swipes
I admit, this shade was a bit out of my comfort zone: I’m used to wearing more natural-looking pinks and corals. But after I got used to it, I really loved this red. Pigmentation will vary from shade to shade, but Wine With Everything has beautiful, full colour from the first swipe.


I wore Wine With Everything for the first time for a friend’s birthday last week, applying it straight from the tube. I wasn’t expecting it to apply as vibrantly as it did (despite the fact that I had already swatched it), but it was definitely a pleasant surprise. I was still kinda taken aback by how bright the colour turned out to be, so I blotted for a subtler look in this photo.

Super Lustrous lipsticks are basically the opposite of everything I thought lipsticks were: easy to wear, comfortable, and daytime and/or everyday-friendly. I really believe this line is both a great starting point for makeup beginners and a great find for seasoned makeup lovers.
Drugstores: $8-9 CAD


More Revlon Super Lustrous love:
Revlon Super Lustrous lipsticks (Plums)
Revlon Super Lustrous lipsticks (Reds)
Revlon Super Lustrous lipsticks (Neutrals part 1)

Spring Florals & Stripes

This is an updated repost from my original blog on Tumblr

I love the watery colours of this skirt. It's paired with leggings since it's still cold out :> The turquoise cardigan has a fine stripe that's not obvious unless looked at close up.

Revlon Super Lustrous Lipsticks (Plums)

This is an updated repost from my original blog on Tumblr

I’m not sure why some of these colours have been classified as plums (as specified by the Revlon Super Lustrous display) or what makes a colour plum in a technical sense. I’d call maybe the deeper half of this range plums, and the rest pink and red. Regardless of what shade family they belong to, there are quite a few lovely shades to be found here.
Temptress (creme), Rose & Shine (pearl), Berry Rich (creme), Goldpearl Plum (pearl)
Satin Plum (pearl), Plum Baby (pearl), Mauvy Night (creme),
Icy Violet (pearl), Iced Amethyst (pearl)
Plumalicious (pearl), Berry Haute (creme), Va Va Violet (creme)
Note: the photo above was taken on the top side of my arm rather than the underside--that's why the swatches don't look as smooth!

Most of the swatches here achieved great colour with 2-3 strokes. Berry Rich was beautiful after just one stroke.


More Revlon Super Lustrous love:
Review: Revlon Super Lustrous lipstick in Wine With Everything (creme)
Revlon Super Lustrous lipsticks (Reds)
Revlon Super Lustrous lipsticks (Neutrals part 1)

Revlon Super Lustrous Lipsticks (Reds)

This is an updated repost from my original blog on Tumblr

Don't be scared by the "reds" description! There's a nice variety in this family, from brights to more muted my-lips-but-better shades.
Peach Me (creme), Fire & Ice (creme), Ravish Me Red (creme),
Love That Red (creme), Wine With Everything (creme)
Kiss Me Coral (creme), Wine With Everything (pearl), Spicy Cinnamon (pearl),
Raspberry Bite (creme), Sultry Sable (creme), Blackberry (creme)
No duds here. I was quite impressed with the pigmentation, and they applied very smoothly. It was while swatching these shades that I fell for Wine With Everything, which I went on to love and review. It’s kind of strange that there are two Wine With Everything shades, but one is a frost/pearl (#520) and the other is the creme I own (#525). The creme is a deeper colour that doesn’t have as much pink.


More Revlon Super Lustrous love:
Revlon Super Lustrous lipsticks (Plums)
Review: Revlon Super Lustrous lipstick in Wine With Everything (creme)
Revlon Super Lustrous lipsticks (Neutrals)

Review: Urban Decay Jackpot 24/7 Glide-On Pencil Set

This is an updated repost from my original blog on Tumblr

I’ve loved the 24/7 liners from afar for a while now, swatching and admiring their smooth application and vibrant colour before—with a heavy heart—having to turn away at the $20 CAD pricetag. I finally gave in for Jackpot because of the awesome value of the set: the 9 half-size liners plus a full-size liner pencil in Zero was well-worth the $43 pricetag (I think I got $15 off because of a coupon on top of that!)

Although the Jackpot set is no longer available, all of the shades in the Jackpot set (except Whiskey) can be purchased individually as a full-sized pencil.

The 24/7 Glide-On eyeliner pencils are one of Urban Decay’s best-known and best-selling items, and I can certainly understand why. These liners truly “glide” when applying them in all their creamy and effortless awesomeness. They impart lovely, pigmented colour with the tiniest amount of pressure. Although there are other eye products out there that feel lovely and creamy on application, 24/7 stands out because it sets on the eyelid quickly and does not crease or smudge (I'm looking at you, Rimmel Eye Glistener.) Their creaminess makes them easy to use for tightlining and lining the lower lashline, which can be especially painful and difficult with too-hard liner pencils, while staying put due to the waterproof formula. And I mean seriously waterproof. After taking pictures of the swatches on my arm, I tested rubbing them off my arm under a running tap for a while but they didn’t budge. I finally got them off with a combination of cleanser and eye makeup remover.

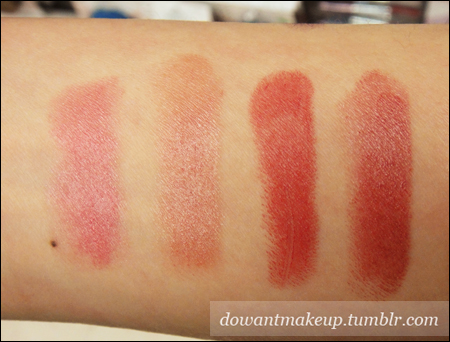
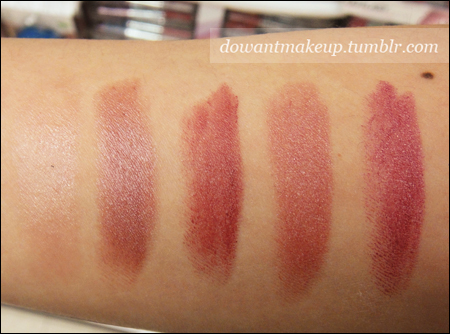
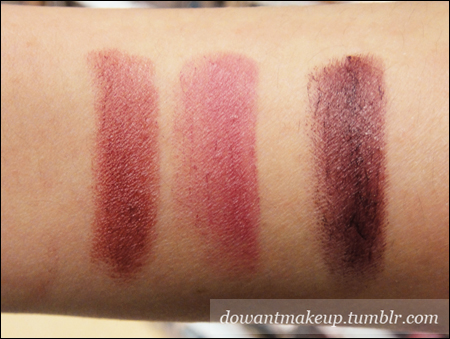
The shades included in the Jackpot Set are Eldorado (gorgeous true gold), Rockstar (dark plummy purple), Whiskey (burnt sienna-ish brown), Mildew (deep warm green), Electric (bright aqua blue), Ransom (bright purple), Binge (navy), Gunmetal (shimmery grey), Stash (dark golden olive), Zero (black)

Sidenote: Annabelle Metallic Kohl eyeliner in Mojito is actually pretty close to Mildew shade-wise, but Mojito is just a bit warmer with more yellow in it.

Eldorado, Mildew, Electric, Binge, Gunmetal, and Stash are the shades that have the most shimmery metallic look, whereas Rockstar, Whiskey, Ransom, and Zero have a more subtle shimmer or lean matte. This is a very versatile set because all kinds of looks are possible, from subtle neutrals to bright and fun colour. 

These pencils would be awesome for those that have difficulty drawing their eyeliner with a wing. Because 24/7 pencils are so creamy, I can draw a line on my upper lashline, then use an angled liner brush to go over the line and pull it out for a perfectly crisp wing. Much easier than winging your eyeliner with gel or liquid liner, which can be so finicky!

All in all, this set was an amazing purchase: creamy, soft, smooth, and long-wearing pencils that worked out to be about $4 each—$3 if you consider the coupon I used. Sometimes value sets aren’t that great of a deal for me because there are shades or products in the set that I don’t like. This is definitely not the case here, as I love all of the shades included in the Jackpot set--although if I had to choose, my faves are Eldorado, Mildew, Zero, Rockstar, and Binge.

Tuesday, April 24, 2012

Review: Hard Candy Blush Crush Baked Blush in Living Doll

This is an updated repost from my original blog on Tumblr

After trying and loving the gorgeousness that is Honeymoon, I couldn't help but snap up another Hard Candy baked blush. And I have to admit that it overtook Honeymoon's place in my heart.
Artificial lighting, no flash
Hard Candy Blush Crush blushes come in sturdy clamshell packaging that belie its seriously affordable price. Since they’re baked, I also feel the blush inside is also less likely to crumble or break if you drop it.
Artificial lighting, flash
This picture is the one that most accurately captures the colour of this blush in the pan. It is a cooler-toned pink with butter-yellow veining.

Artificial light, no flash
As with Honeymoon, this blush can be used wet for a more dramatic look. On the left is Honeymoon dry (it’s a little hard to see because of its paleness/subtlety) and wet, then Living Doll dry and wet. Using it wet intensifies the shimmer in the blush, while the dry is more wearable and the shimmer is subtle enough to wear in the office.
Artificial light, flash
You can really see the cool-toned pink of Living Doll here. It's the bright and fun sister of soft, sweet, and demure Honeymoon. The colour payoff on this blush is quite good: I just need to swirl my brush over it a bit and sweep it over my cheeks for an instant pretty flush.

I love that I can put this blush on at 6:30am and still see it on my cheeks at 6:30pm. I've had this blush for over a year now, and I still reach for it all the time. I prefer it over Honeymoon especially in the winter when my face really needs some colour.

Wal-Mart (exclusive): $8 CAD

Review: Hard Candy Blush Crush Baked Blush in Honeymoon

This is an updated repost from my original blog on Tumblr

If you've ever lurked your closest Wal-Mart's makeup aisles, I bet you've paused at the Hard Candy makeup display. Cute packaging, fun product names (Glamoflauge concealer, Welcome Matte pressed powder), and budget-friendly pricing all make it worth a second look. And if you've read all the positive reviews out there, it gets even tougher to tear myself away without buying anything! In particular, I read Rae’s review of Honeymoon, which was so glowing (haa) and convincing, I couldn't not get it.

The blush is housed in fairly sturdy plastic clamshell packaging. The clear window in the top enables easy admiring of this lovely shade :B I love the purple veining, so much that I went through all the Honeymoon blushes available on the shelf and specifically picked the one with the most veining, haha.

This blush is a touch pinker and brighter in person, but I think it's still wearable for both warm and cool skin tones.

Dry, lightly swatched / dry, heavily swatched / swatched wet
The far left might be a little hard to see, but a light application gives just a kiss of a glow. As the label says, the blush can be used wet for a more intense look.
Before and after, applied dry (please excuse the giant watermarks ≧Д≦)
For reference, I'm NC20-25. I used just Honeymoon for a very subtle glowy colour on the cheeks, but I have also used it as highlighter for the tops of the cheeks and then another blush below that. I'm careful to not to get carried away in the application while trying to build up more colour, because the fine shimmer builds up a lot faster and the look can become more shimmery than intended. Applied with a light/moderate hand, the shimmer is not overwhelming and I have no problems wearing it to the office.

Since I’m always trying to find ways to turn my makeup into multi-taskers, I’m also wearing Honeymoon on my lids and inner corners in the before and after pictures. I like how it brightens my eyes a little.

If you can’t make out the ingredients: mica, talc, mineral oil, dimethicone, magnesium silicate, phenoxyethanol, methylparaben and may contain titanium dioxide, iron oxides

This is a really pretty, luminous blush/highlighter that will work with a lot of different skin tones. It sort of reminds me of a blush/highlighter version of MAC Gleam eyeshadow when I look at the swatches. For the price, I’m definitely happy with my purchase.


Wal-Mart: $8 CAD

Sunday, April 22, 2012

Review: Wet n Wild Mega Liner in Turquoise

This is an updated repost from my original blog on Tumblr


I picked up this lovely over in Washington state, after the pretty turquoise bottle practically jumped at me and clawed at my wallet.

These liquid liners from makeup-lover-on-a-shoestring-budget fave Wet n Wild also come in Black, Purple, Blue, Brown, and Dark Brown. I am an absolute sucker for turquoises and teals, so Turquoise was an obvious choice for me. Aside from Blue, I wasn't too interested in the other shades since I already have gel liners in those colours.

Here’s what the product page has to say about the Mega Liners:
Easy-to-control liquid liner has a fine, flexible brush for precise application. Rich, fluid formula dries fast and stays put to subtly enhance or dramatically define.
How did the product and testing hold up to Wet n Wild’s claims?

For $2.99 USD, this liner has hit the mark on all counts. Turquoise is bright with a metallic finish and makes my eyes pop.

I used to be a liquid liner pro as a teenager and worked that black Maybelline liner. I’ve probably lost most of my liquid liner powers since I discovered MAC Fluidline, but I was able to line my upper lashline and make a wing easily. The brush is very thin and indeed flexible and easy to use. A very light touch deposits a smooth line of colour.

It also dries quickly: I don’t find myself needing to keep my eye closed while I frantically hand-fan it to dry (ahem). Afterwards, it stays put with no creasing, fading or smudging. I’ve fallen asleep on the couch and woken up six hours later to find my liner still perfectly in place! Despite all this, it comes off easily with cleanser and makeup remover like any regular liner.

Long story short, this liner is an easy and gorgeous way make your eyes pop. Don't be surprised if you catch people staring at your eyes when you're wearing it! It's an awesome drugstore product with a ridic pricetag.

A long while after buying Turquoise, I tried Blue and Purple. Sad to say, they didn't impress and are totally skippable. The pigmentation wasn't great and they weren't metallic like Turquoise. Well, at least they were cheap.


 Drugstores: ~$2.99 USD / ~$4.79 CAD

Saturday, April 21, 2012

Review: Jack Black Intense Therapy Lip Balm SPF 25

This is an updated repost from my original blog on Tumblr 

Jack Black is a line of men’s skin care products, ranging from shaving cream to hair styling to my favourite lip balm, Intense Therapy SPF 25.
No, not that Jack Black. (It's okay, I thought so too.)

This review was specifically written for the Natural Mint & Shea Butter version, but other offerings include Vanilla & Lavender (!!!) and Black Tea & Blackberry. I also have Lemon & Chamomile, which I actually prefer for its sweet-but-not-too-sweet lemony scent, like some kind of delicious lemon baked good.

I had read tons of positive things about it, so being a lip product junkie, how could I resist?

My lips are eternally dry, and since it is a product marketed toward men, I was expecting some no-frills moisturizing that wouldn’t irritate the eczema around my mouth. It definitely did the trick without feeling thick or heavy, and has only a very subtle shine.

To me there are two types of lip balms: the ones that maintain your lips' already-good condition, and the ones that really moisturize when your lips look like they are competing with the Sahara desert. Jack Black Intense Therapy is definitely the latter; this is absolutely the one I turn to when my lips are desperately in need of moisturizing and softening. I have recommended this balm several times to both male and female friends and they always love it.

Some people have compared this product to Carmex tube balm, but I feel that Intense Therapy is definitely superior. I prefer the slanted tip applicator on Intense Therapy to the rounded applicator on Carmex, as well as the lighter texture compared to the heavier feel that the Carmex balm has on my lips. Lastly, the cherry Carmex I bought has a heavy, synthetic scent that I'm not too fond of.

All in all, it’s a great product. Bonus: the man-friendly packaging means the men in your life (boyfriend, guy friends, dad) won't be too shy to borrow it for their own chapped lips. Sharing is caring!

Ingredients: Octinoxate (7.5%), Avobenzone (3.0%), Natural Mint Flavor (Aroma) Butyrospermum Parkii (Shea Butter) Fruit, Persea Gratissima (Avocado) Oil, Camellia Sinesis (Green Tea) Leaf Extract, Tocopherol (vitamin E)


Sephora: $8.50 CAD
Check out the retailer locator at the Jack Black website to find other stores that carry Jack Black products.

Friday, April 20, 2012

About Epilators & A Review

This is an updated repost from my original blog on Tumblr

Epilators aren’t too easy to find (at least in my experience; I’ve only ever seen it at London Drugs and on the Canadian Tire website), so it’s no surprise that not many people know about it. Imagine rows of flat-edged tweezers arranged on a cylinder. As the cylinder spins, the tweezers open and close, so that each tweezer closes over a hair (say on your arm or leg), and then plucks it out. And it’s electric. That’s pretty much what an epilator is.

A big selling point for this device is that the hairs will take much longer to grow back than if you were shaving, because it removes hair at the root. Mine claims it can keep hair away “for up to 4 weeks”. According to the manual, mine is designed to be used on the legs but can be used it safely on arms, underarms, and bikini line.

Note that there is a cord that plugs into the bottom of the epilator
A few years ago, I bought a Braun Silk-epil Soft Perfection epilator from London Drugs. It was on sale for $60 CAD and came with a $10 off coupon for any CG lip product and a two-year warranty from Braun. Please note that this is my first and only epilator, so I don't really know how it compares to other epilator models.

First impressions: fucking terrifying. When you turn it on, it is super loud and intimidating. I was crapping myself and bf let me test it out on his leg first. After the initial scariness, it is actually pretty straightforward and simple to use, since you just slowly glide it over your body just as you would when shaving.

There are two speeds: the cylinder spins faster (and the tweezers open and close faster) on second speed and will remove hair better, but isn't as comfortable on your skin as the slower, first speed. My suggestion is to always start with the first speed when testing it on a new area and switch to the second if you are comfortable.

It comes with two attachments that go over the spinning cylinder with the tweezer bits. One has two thin, spiky rollers (top right) to help numb the discomfort of the epilating. This is useful if you are sensitive, removing hair that is thick or deeply rooted (which seems to hurt more), or are generally a wuss. The numbing rollers really help; I use it for my underarms. The second one has a sort of plastic guide. The manual explains that it is better at removing hair and following the curves of your body than the spiky one if you can do without the numbing rollers. I use this attachment for my legs and arms. It also comes with a stiff brush to help you clean the tweezed hairs off of the cylinder.
© Do Want Makeup 2016 | Blogger Template by Enny Law - Ngetik Dot Com - Nulis