Tuesday, October 28, 2014

Vampire bat nails

How can I do a bunch of Halloween-themed nail art looks without including a classic scary monster/Halloween costume go-to? My vampire has a bit of a tan, but he's arrived with all of his bat minions >:D

Vampire bat nail art
In my Ominous Owl nail art post, I had suggested using a deep purple or red as a backdrop if you didn't have a sufficiently Halloween-y orange. I took my own advice and did a gradient sky with my two favourite deep purples, Zoya Ciara (base) and Layla Pro N.15 Purple Vamp. I really love how my bats against the gradient sky turned out--so much that I kind of wish I had done my entire hand like this (Mr. Vampire can be flying incognito among them lolol)

Vampire bat nail art
I used Nails Inc Basil Street as the base for my vampire, but I realized that my perfect nude shade is not quite right for him :< I should have put down a base colour of white to layer Basil Street on top of, in order to give him a more ghoulish, pale cast. The bats, moon, eyes, mouth, hair, and oversized fangs were all done in acrylic paint.

Monday, October 27, 2014

Costume Quest nails

Some people have a Halloween tradition of dressing up and going out to a party or carving lots of jack-o-lanterns. My Halloween tradition is to play Costume Quest and hand out the candy I like least to trick-or-treaters first, hoarding as many Coffee Crisps and Kit Kats for my personal consumption as possible. So when I started thinking up ideas for Halloween-themed nails, I just couldn't pass up an opportunity to try my hand at Costume Quest-inspired nails.

Costume Quest nail art
Costume Quest is one of those Games I Never Shut Up About™™™, meaning that it's a game that I really, really love and I will take any possible opportunity to tell you about it and why you should love it too. Costume Quest is a video game about trick-or-treaters that end up going on an adventure to rescue one of their friends from sugar-loving monsters.

image source: Wikipedia
Why do I love Costume Quest? Because I love the idea that on Halloween, these kids "become who [they] really are inside". When walking around in the neighborhood, the kid looks like s/he's just wearing blue boxes as a robot costume. In battle, s/he becomes an epic Gundam-looking robot that shoots rockets. I love getting a new costume and finding out what kind of awesome monster it translates to in battle. I love that you can choose between a male or female protagonist and that the dialogue is the same whether you are playing the boy or the girl. I like that in the promo materials, the female twin Wren's costume is a knight and not a princess or other gendered costume. I like the inclusion of POC. Basically you should just get it so we can be Costume Quest friends and talk about how great it is.

Friday, October 24, 2014

Swatches: hunting for my perfect plum lip

Last year, thanks to the Annabelle TwistUp campaign, I discovered a real love for deep, plummy lips thanks to Annabelle Royale. Of course, as a beauty blogger and all-around makeup magpie ("oooh, shiny!"), I can never settle with just one product, no matter how lovely it is. I wanted to find another stunner.

What I'm looking for: A deep plum. Not too cool-toned or red-leaning or blackened, and nothing too frosty or shimmery. (I suddenly feel like Goldilocks...) Anyway this somehow this spiralled down into a drugstore/Sephora swatch-fest of no less than 24!!! lip products. Way too much to post on Twitter, so I've thrown them all together in a blog post.

I'm not exactly happy with the swatches; I have adjusted them in Photoshop for better colour accuracy but bad lighting + phone camera = less than perfect results, and I am not about to re-swatch all of these. Hopefully somebody will find this somewhat helpful, as at least it offers some side-by-side comparisons.

A lot of these swatched much more berry or pink or red than I would have expected from the name or even the colour of the product itself. It's difficult to tell because even the colour in the tube can be deceiving sometimes: the actual lip bullet would look decently deep or plummy but then swatched much lighter or pinker than I expected.

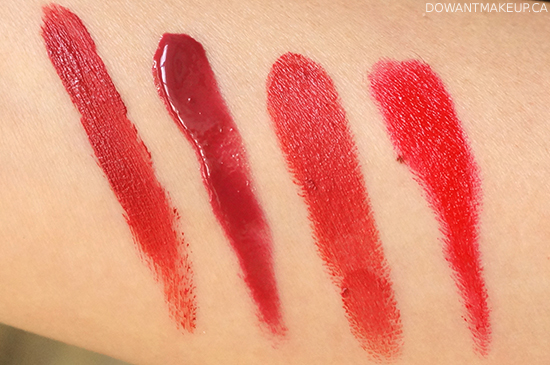
Note: swatches are shown with 2 passes

Drugstore swatches 1 - with flash
From left to right: L'Oréal Colour Riche Extraordinaire Lip Colour in Plum Adagio, L'Oreal Colour Riche Caresse Wet Shine Stain in Berry Persistent, Rimmel Matte Lasting Finish by Kate Moss in 107, Maybelline Color Sensation Elixir in Amethyst Potion, Maybelline Color Sensation Elixir in Caviar Couture, Maybelline Color Sensational Lipstick in Plum Paradise

Booooo. While lovely, most of these lean very red, even Plum Paradise. 107 is straight-up red. Plum Adagio stands out for being quite dark, but the actual colour reminds me more of a black cherry (needs moar plum!)

Thursday, October 23, 2014

MaskerAide sheet masks

I'm always looking for ways to plump and protect my often-dry, sensitive skin, especially during fall-winter when windy weather and going back and forth between cold outdoors and warm, dry indoors can wreak havoc on skin. I'm especially wary around this time of year when my skin sensing/reacting to the weather transitioning--this time last year I had a shockingly bad and inexplicable eczema flareup that affected basically a third of my face. So when the recently-launched Obsessed Canada offered to let me check out a few hydrating masks from the MaskerAide sheet mask line, I was all um yes please but also secretly: I really hope this doesn't make my face freak out. Spoiler: everything turns out okay for my face.

The MaskerAide range of sheet masks promise a "highly-concentrated Argan Oil based serum" with six different masks to suit your skin's needs. Out of the six, I chose to test I Don't Wanna Grow Up, Weather Warrior, and Beauty Rest'ore. I love the playful illustration style of the packaging, which shows the mask being worn in a setting that fits the theme of that mask--in I Don't Wanna Grow Up, our heroine is splashing in a fountain.

I Don't Wanna Grow Up promises to "lift, firm, and soften fine lines" and features ylang-ylang oil, vitamin E, collagen, and elastin to fight signs of aging.

Tuesday, October 21, 2014

An ominous owl

Hello! I've been sitting on this Halloween-themed nail art for about a week and figure it's about time to share. I'm actually a huge wuss when it comes to scary stuff--lately I've been seeing cool tutorials for spiders and eyeballs but it's not my style (hate spiders, find clusters of eyeballs unsettling.) Instead I have a vaguely Halloween-y/fall nail art with elements I enjoy painting much more :>

My ominous owl is sitting on a creeeeepy tree silhouetted by the spooky moon.. or something. I used orange nail polish from Metropolis at Metrotown's Pop Up Nail Bar and acrylic paints. I would have liked to use a more accessible orange nail polish, but this is the only truly orange, Halloween-appropriate polish I have--the others lean a bit peachy or coral. Covergirl Glosstini in Orange Oasis, Color Club Koo-Koo Cachoo, and Zoya Thandie seem to be good options.

The orange is a bit off here--first photo is more colour-accurate!
This nail look is incredibly easy to do. I love painting spindly, knobby tree branches and they're so beginner-friendly because they don't need a super steady hand. In fact, it might turn out extra cool with a slightly shaky hand. To do this look, you need to first paint on your base colour (if you don't have orange, try a deep red or purple!). Next, add your moon in a pale, buttery yellow. Use a sheer pale yellow or white going around the moon to imitate a "glow". I also meant to go back in and shade in craters but forgot. Paint in your tree trunk, and then branches with a fine brush. Add an oval blob and paint little ears on for your owl. Lastly, use a dotting tool and use the same polish as the moon to dot in the eyes. Let everything thoroughly dry before applying your top coat and you're set!

What do you think of my ominous owl? What Halloween-themed nail looks have you been loving?

Saturday, October 18, 2014

Canadian Arts and Fashion Awards 2014 Vancouver Cocktail

Today's post is a real multitasker: nails, makeup, and outfit all rolled into one! Last month I attended a cocktail event celebrating the Canadian Arts and Fashion Awards (CAFA) at the gorgeous Fairmont Pacific Rim. CAFA is all about recognizing achievements in the Canadian fashion industry, including stylists, designers, photographers, and models. Canada has so much fantastic talent; it was a great opportunity for me to do a little homework and learn about some homegrown designers I hadn't known before. I wanted to do a nail design inspired by the work of one of CAFA's 2014 winners and ended up really loving the Womenswear Designer of the Year, Jeremy Laing. Here's the inspiration, from the SS 2014 show:

source: Jeremy Laing website

I translated it into a white-on-beige windowpane look using Nails Inc Basil Street, OPI Alpine Snow, and nail tape. I had never done such an elaborate tape mani before and it was honestly a frigging pain in the ass. You can see I had a lot of trouble on the ring and middle fingers, where the tape took off some of my base colour Basil Street and/or left an uneven edge on the white polish I painted over top. I love that Basil Street is my perfect nude: it covers the whites (tips) of my nails and gives the illusion that I did the windowpane directly on top of my bare nails. I ended up being surprised by how cool and chic it looked, and I got a lot of compliments on it too. If you would like to try this look yourself, I have a tutorial coming soon! I started writing some quick tips on how to do this look here, but it became so long that I'm just going to turn it into a separate post .__."

Friday, October 17, 2014

Lise Watier Féline Eyeshadow Quartet

Hello! More Lise Watier today: here's the lovely Féline Eyeshadow Quartet, which is another piece to the fall Féline collection, along with the Féline Lip Lacquer in Rouge reviewed previously this week.

Lise Watier Féline Eyeshadow Quartet
The gorgeous leopard print takes centre stage here in a rose-gold trimmed compact. The compact has a pleasant weight to it--not super heavy, but doesn't feel flimsy--and is held shut with strong magnets (no need to wreck your mani trying to pry this open!)

Lise Watier Féline Eyeshadow Quartet
The compact looks a little yellow on my monitor but I promise it's rose gold!
The four colours in this quad are a pale champagne, medium taupe, pale rose pink, and copper, all with some shimmer to them. They are lightly stamped with leopard-print impressions. A small well holds two dual-tipped sponge applicators, but could hold a small travel eye brush as long as it is 8 cm or less.

Lise Watier Féline Eyeshadow Quartet
I really liked the soft, buttery texture of these shadows. Bonus: unlike some other eyeshadows from various brands I've tried, these didn't kick up a lot of powder when I ran a brush through them, so things don't get messy.

Wednesday, October 15, 2014

Lise Watier Féline Lip Lacquer in Rouge

New and for just a limited time during this fall season, Lise Watier is introducing their Féline collection. This three-piece collection features a beautiful leopard motif accented in rose gold. I will be posting about the eyeshadow quartet and eyeliner soon, but today is all about the gorgeousness of Lise Watier's Féline Lip Lacquer in Rouge.

Lise Water Féline Lip Lacquer in Rouge
Féline Lip Lacquers promise a highly pigmented, long-lasting formula with a matte finish. Rouge is a deep tomato red with neutral undertones. (If you're not convinced by the beautiful red in the swatches below, Féline Lip Lacquer is also available in Nude, a rosy beige.)

I've always been a little wary of matte lip products because they can be drying, which is bad news for extra-dry lips like mine. Happily, I was surprised to find that the Féline Lip Lacquer was very comfortable to wear and not heavy-feeling even on dry, sensitive lips like mine. I also loved that despite the lipgloss-like packaging, it isn't sticky like a gloss at all. I tested this during the summer and was so pleased to be able to wear this driving with the windows down and not end up with a mouth full of hair!

Lise Watier Féline Lip Lacquer in Rouge swatches
LW Féline Lip Lacquer in Rouge / Korres Lip Butter Glaze in Raspberry / Revlon Super Lustrous in Wine with Everything / Annabelle TwistUp in Red Carpet
In my collection, Rouge is probably closest to Revlon Super Lustrous lipstick in Wine With Everything, but Rouge is just a touch deeper and has a matte finish. Wine With Everything has a slight brightness to it in comparison to Rouge.

Saturday, October 11, 2014

Layla Thermo Polish Effect No.4

I've seen thermal polishes for quite a while and was always interested, but also too lazy to place an order online. Then Layla Thermo Polish Effect popped up at London Drugs--but at $9.99 for a small 5ml bottle (most polishes come in sizes of 13-18ml!), I decided to wait for a sale. I stopped by London Drugs on Thursday to find that the Thermo Effect polishes were on clearance! Even though I bought mine just two days ago, I feel like I have some kind of solemn blogger duty to swatch and post about this ASAP so that interested parties can hurry to their London Drugs and check them out before they're all gone!

Layla Thermo Polish Effect in No.4
When warm, the polish is a pearly rose pink; the colour makes me think of a spring tea party in a garden! Depending on the lighting, it can look cooler-toned. Application was easy with no notable problems. The brush is on the wider side and dense (i.e. it holds a lot of polish!), so I was careful to wipe the back of the brush (side facing me) and two sides each time I dipped it back in the bottle. Even with three coats, there is still a slightly visible nail line, but that's common with polishes that have a slight squishy look like this one.

Layla Thermo Polish Effect in No.4
Here's how it looks after running the tips under cold water. The cold turns the pink into a pretty magenta. If you have long nails, then this gradient effect will come naturally because the tips extend far out enough from your body heat to stay cool.

Layla Thermo Polish Effect in No.4
This is after running my fingers fully under cold water for a few seconds. Full-on magenta awesomeness! I don't produce a lot of body heat so my nails stayed like this for much longer than I expected.

I can't comment on the wear of these polishes yet but so far I like the application and the neat thermal effect. I'm also pleased to see that the effect works even with a thick top coat like Seche Vite (worn in all photos). I did have a wtf?? moment while waiting for my polish to dry though: the back of the polish actually says that it's for false nails only! I wasn't sure what to make of this, but it seems like lots of people have worn this on their natural nails without any problems. The effect works and my nails haven't shrivelled and fallen off yet so ???

Anyway, I found mine in the clearance bin in the London Drugs beauty section for $6.99. If you've always wanted to try a thermal polish but couldn't be bothered to order online or pay for shipping, check it out. I was tempted by other colours such as light/dark green and light/dark teal blue, but passed based on the fact that I have way too many polishes in both colours. Unfortunately the Layla Thermo Polish Effect line is not on the London Drugs website, so your only chance is in-store.

Have you tried thermal or other special effect polishes?

Tuesday, October 7, 2014

Then & now: Floral stripe nails

Fun fact: a lot of things that I photograph end up not being posted; I get weird and nitpicky and end up not posting at all out of frustration/exasperation/older photos getting buried under new content. I recently uncovered a couple photos of a nail art look I did last year that didn't go up probably for one of the above-mentioned reasons:

Floral stripe nail art
Essie St. Lucia Lilac / Orly Luxe / Orly Ancient Jade / L'Oreal Colour Riche Violet Vixen
I love the florals-on-stripes look and decided to try it for myself, even though I don't have much practice painting either. Stripes came out a bit uneven, using gold to define the rose petals looked a little confusing against the gold stripes, etc. etc.

Here's the look again a year later with my steadier hand, (hopefully) better technique, and better assortment of nail art brushes:

Floral stripe nail art
China Glaze Lotus Begin / Orly Luxe / Orly Ancient Jade / Clinique Grape Ice / Zoya Ciara
I swapped out the more muted lilac of Essie St. Lucia Lilac with the punchier China Glaze Lotus Begin, and used Clinique Grape Ice as the base colour for the roses and Zoya Ciara to define. A little better but not by leaps and bounds since I practice roses never .__.

Anyway, the whole thing has kind of inspired me to try recreating some of the old nail art from 2+ years ago to show how I've improved, and by extension, how anybody else can get better too :>

Floral stripe nail art
Have you ever tried to recreate or improve on your old makeup/nail looks?

Friday, October 3, 2014

Summer adventures: Manning Park

This may come as a shock to you, but I'm not the outdoors-iest person ever. People that know me were legit shocked that this summer I ran around in a provincial park, hiking, climbing rock faces and stuff. Truthfully, I really love landscapes, plants, and animals (I just hate sweating and tanning and spiders.) Manning Park, if you can make the ~3 hour drive out of the Metro Vancouver area, is truly a beautiful place to get some downtime with Mother Nature. I enjoyed it so much that after a day trip with bf and friends, I talked MizzJSheila, and their significant others into an overnight couples trip. Since I wanted to share a bunch of the neat photos we took, today's post is pic-heavy and low on the text!

I loved exploring the sub-alpine area. Everything is super lush and green and dotted with colours from all the wildflowers.

The Lightning Lakes (a chain of four lakes) are really clear and gorgeous. We kayaked and canoed up and down the lakes and took in all the gorgeous scenery.
© Do Want Makeup 2016 | Blogger Template by Enny Law - Ngetik Dot Com - Nulis